Wednesday, May 21, 2008

Digital Zoom Versus Optical Zoom


Many digital cameras offer both digital and optical zoom. These two often confuse the average camera buyer, until you know what you’re looking at.

Optical zoom works much like the zoom lens on a 35 mm film camera. It changes the length of your camera’s lens and draws the subject closer to you. The optical zoom keeps the image quality high. Digital zoom on the other hand works differently. It simply takes the picture and crops it then enlarges the part that is left. It causes the quality of the photo to be reduced, sometimes greatly.

What this means in terms of quality output is you may have a larger view of an object with the digital zoom, but chances are your image will become unfocused and grainy. Details will become lost. It is actually best to turn off the digital zoom feature of your camera if possible. This will prevent you automatically zooming in too close as the digital zoom is often an extension of the optical.

Digital zoom has its place. It can be used if the only destination of your photo is the internet. Photos online can be a much lower quality in the camera and still appear acceptable when sent through e-mail or posted on a web gallery. If your goal is printing, however, seek a camera that has a greater optical zoom and turn off the digital zoom.

There are a couple of things you can do if you want a closer view of a subject but want the quality of your picture to still be good. Try moving in closer when you take the picture. Often only a foot or two will do the trick. If this isn’t possible, you can set your camera to take a picture at its highest file size. This will result in a photo that can be cropped to include only your desired subject, yet allow for an image that is still clear.

If the image is of high enough quality you may be able to crop and enlarge using photo editing software and end up with a much better looking photo than letting the camera do it. By not using the digital zoom your pictures will be better in the end, even if they are not as close up as you would like.

Sunday, May 18, 2008

Free Online Photo Editing! ANNOUNCEMENT!


Over on my website you can now upload and edit your digital photos for FREE! Do you want to get rid of that red-eye you always get when you use flash? Now you can very easily with this new service!

Would you like your photos to show perfect smooth and lustrous skin? Smooth wrinkles, or crop out your old boyfriend? Can do!

You can also use a wide variety of effects to turn your digital photos into works of art you will be proud to show off to all your friends and family.

And the best thing is there is no program to download and install and fiddle with. You can also edit you photos from any computer connected to the internet!

To use just click on the icon above which will take you to the Photo Editor Control Panel. The upload a photo or click on one of the three example photos and play! The best way to learn this software is to experiment and see what happens! But if you have any question please feel free to leave a comment here or email me.

Be sure to bookmark the control panel so you can find it quickly the next time you need to edit your photos.

Most of all.... Have FUN!

Thursday, May 1, 2008

Get Picture Perfect Shots via Digital Photography


Nowadays, there are a large number of photographers who have decided to shift from old SLR models to digital ones. Through DSLRs, they can get more time to concentrate in taking those great pictures since images that are not par with their standards can simply be deleted. Also as there is no film to buy and process, taking tons of pictures is as cheap as taking just a few.

SLR stands for Single Lens Reflex. The name implies the use of lenses and a mirror. Mirror reflects light entering the lens up into the viewfinder. Thus, a photographer can estimate how the image will likely appear when it is developed. Moreover, a SLR camera uses separate lenses that can be interchanged depending on the resolution needed.

Likewise, a digital SLR or DSLR camera uses lenses and mirror. But instead of a film that records the image, a DSLR camera uses light sensor chips and digital memory. In other words, a DSLR camera is the computerized version of the traditional SLR camera.

However, the functions of these models are rather different so it is suggested that users spend time getting familiar or acquainted with their owners manual. Owners should use that “trial and error” technique by taking a few shots and storing better pictures. Sooner or later, users can surely master these cameras.

Individuals who decide on using these types of cameras should really invest on memory cards and lenses. The lens can be more important than the camera body as even the most expensive camera is only as good as the lens attached to it.

Here are some more helpful tips that will aid owners of DSLR cameras in capturing a perfect image using the art of digital photography.

1. Normally, people take full body shots against a background. However, it is more appropriate to take a shot from shoulders up or an upper body one because image of those in the picture really appear small. Nobody wants to see Uncle Harry's hairy bowed legs anyway.

2. The law of optics remains the same whether using an old or a digital camera. For instance, if the sun is behind an image, the picture will be silhouette. If light is in front of the image, the subject will appear to squint and that makes for a bad image, unless it's Clint Eastwood.

3. A polarizing filter will remove glare. When using a polarizer, be sure that the source of light is 90% to the subject.

4. Try a few shots with your white balance setting changed auto to cloudy when shooting bright landscapes and outdoor portraits.

5. Do not use the flash mode when the setting is already sunny. Off camera flash can be used in some circumstances which I'll cover in the future. Using the on camera built-in flash is a great way to ruin an image anyway.

6. Zoom in to emphasize a certain asset or characteristic of the subject being captured.

7. Practice. Practice. Practice. And experiment!

It suffices to say that the techniques in getting the perfect shot have not changed from the film days. However, using digital cameras and employing this new art of digital photography have simply improved photo shooting by making capturing pictures easy for everyone.

Got to go. Mr. Eastwood is glaring at me through his polarizing sunglasses!

Tuesday, April 29, 2008

Smoke on the Water

Japanese Kabuki Style!

My wife being Japanese does her surfing mostly on Japanese web sites. She finds some really funny and interesting stuff. When she showed me this I cracked up laughing and knew I just had to pass it on! Enjoy!


And For an encore!


Monday, April 21, 2008

How to Clean your New Diamond


Congratulations! You are now engaged to
be married! Now you have a very busy time
ahead of you so from time to time I will have
wedding tips along with photography related
info posted here to help you on the road ahead.

Now that you have that beautiful sparkling proof
of your future husband's love, you will wish to take
great care of your engagement ring.

Through your day to day movements your
diamond will get smudged and soiled. Even
when wearing them, they collect
dust. Lotions, soaps, our natural skin oils,
can cause film and grime on diamonds
and inhibit their brilliance.

Want to keep that Brilliance and Shine?
Diamonds require cleaning so that maximum
amounts of light can refract fiery brilliance.
Remember that all it takes is a few minutes
and a little care to keep that diamond as fiery
as the day you first saw it.

You can use a small soft brush such as an
eyebrow or lip stick brush and soap and
water to clean your jewelry. Simply make a
bowl of warm sudsy water with a mild
detergent and place your pieces in the
mixture. Then brush the diamonds with the
soft bristles of the brush while they are in
the suds. You will need to make certain that
you rinse them clear of the suds after
cleaning them. You can use a small kitchen
strainer such as a tea strainer to contain
them while rinsing under warm water. Use
a lint free cloth, or a jewelry polish cloth to
pat them dry.

If your diamonds are in need of a stronger
cleansing, you may want to soak them for 30
minutes in a solution of half and half water and
ammonia. Once they have soaked for 30
minutes, remove them and gently brush the
mountings with a small brush. Then replace
the pieces to the solution and swish them
around in the mixture before removing them
to rinse and pat dry.

If you find your self too busy to be mixing
soaps and ammonias, many department
stores sell liquid jewelry cleaners. Most are
kits, with everything you need included. You
need to read the labels to determine the one
that is right for your diamonds and other
jewelry. Read the complete directions and
follow all the precautions.

And if you find yourself more the
“high-tech type”, even in your diamond
cleaning routine, there are multiple ultrasonic
cleansers on the market. These machines
use high-frequency to create a cleaning motion.
All machines are not the same, so please read
the instructions before using.

Only you can choose the cleaning method
right for you. But, it is essential to keep
your jewelry clean to keep it brilliant and
sparkling. Between cleaning, try not to touch
your clean diamonds with your fingers or
handle your jewelry by its edges. This will
help maintain its shine and brilliance for
longer periods.

Monday, March 10, 2008

New Fine Art Images


A few of the new images I have been working on. These will soon be available for purchace on my web store as either regular prints or handmade in the darkroom as limited edition Fine Art Prints.


Sunday, March 2, 2008

Weddings in Japan


I recently moved here from Japan where I have lived and worked on and off for the last few years. I worked as a wedding photographer for a few "Wedding Chapels" in the Tokyo area. In Japan the photographer is more likely to be an employee/contractor for one of these venues rather than freelance. It's VERY difficult for a foreigner to get a business going there. Many Japanese couples want a Western style wedding now so the more "Guijin" (foreigners) employed by the chapel the better. It's all for the ambiance. Even the officiant is just an actor saying the lines! Very seldom is he actually a real Pastor. It's both sad and funny at the same time, but very Japanese!

More and more couples are opting for the western style wedding as it's "kakoi" (Cool). It seems like western culture is really taking root over there with the younger generation of Japanese. My wife says it's because the wedding kimono is so expensive and uncomfortable! When we got married she wanted to wear a traditional American bridal gown. Whatever the reason, could be their way of rebelling against the old school ways? Or perhaps it's just the same as with us here where many of us enjoy learning and experiencing diffrent cultures. There are so many good things about their culture like strong family ties, respect for elders, low violent crime and taking responsibility for their own actions that I hope will never change.

The couple above are dressed in the traditional wedding kimono. You may recognize the temple behind them. It is Kiyomizu-Dera in Kyoto. The temple dates back to 798 but the present buildings were constructed in 1633. One of the oldest wooden buildings in the world! The temple takes its name from the waterfall within the complex, which runs off the nearby hills.

Sunday, February 24, 2008

How to: Lunar Eclipse Photography

As I promised, although I'm a bit late, an explanation on how to shoot good moon and star Or other low light images.

Here is what you need:

A Camera that has a manual shooting mode. All SLR cameras have manual mode and many digicams do as well. If you don't know how to set the manual settings then you need to set down and read your camera manual on how set the settings...... Usually there is a knob on the camera with settings like M, Av, P and/or little icons. M would be manual mode.

Once in manual mode you need to know how to set the f/stop, ISO and shutter speed. This is where the little book that came with your camera comes in handy. All cameras have different ways to set these, either via menus or knobs. On my Canon SLR I have a big wheel on the back and a knob on the top to play with. As I don't know what camera you have I can't help you here. To get the most out of your camera you will need to read the user guide and keep it handy for reference. This means a short trip to your attic, basement, closet or dumpster for a little "Where the heck did I put that" session. Or you could download it from the Internet by going to the manufactures website.
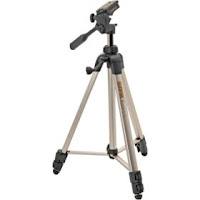
A Tripod. Because you will need to keep the shutter open for several seconds you absolutely need the camera to be mounted on a tripod. Without this support you will end up with images of colorful fuzzy blobs. This can be an artistic statement but that's not what we are aiming for here. In any low light situation the camera needs to keep the shutter open (Exposure time) longer to collect enough light to capture an image. On a sunny day the shutter may only need to stay open for 1,000th of a second, but in low light situations the time needed may be up to several seconds! So unless you're a zen master who can stay so still a bulldozer won't budge you a tripod is the best way to keep the camera steady.

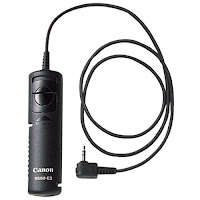
Remote shutter button. This is optional but highly recommended. This is just a simple device that is a button on the end of a wire that plugs into your camera and allows you to snap the image without touching the camera. Some cameras may not have this option available. Your camera manual will usually list the options available.

Hot Coffee or other caffeine laced liquid. It can get cold out there at night!

So now that you have the equipment ready we are all set to take some lunar eclipse photos.

1) Set up you camera on the tripod and plug in the remote shutter button.

2) Set ISO to 100 or 200 - What ISO denotes is how sensitive the image sensor is to the amount of light. The higher the ISO, the more sensitive the image sensor and therefore allows the possibility of shooting in low-light situations at faster shutter speeds. The lower the ISO the cleaner the images will look. You could hand hold the camera set at a high ISO because it requires less exposure time but the images will look grainy. I like the clean crisp look shooting at low ISO.

3) Frame the moon in your viewfinder. Use your best telephoto lens or the optical zoom on your digicam. Do not allow the digicam to go into digital zoom mode as digital zoom is not really zoom. What digital zoom does is enlarge a portion of the image, thus 'simulating' optical zoom. In other words, the camera crops a portion of the image and then enlarges it back to size. In so doing, you lose lots image quality.

4) Set the f/stop (Aperture) to 5.6 or 8.0. This is the "sweet spot" for most lenses where you get the sharpest, cleanest images.

5) Set the Shutter Speed (Exposure time) to 1/30th of a second if the moon is bright or to 1 second if the moon is in eclipse.

6) Focus! Try auto focus first. If auto focus can't grab the shot because the light is too low then you will need to manually focus. This can be difficult due to the low light at full eclipse but you can get really close. You may want to experiment and take several shots at slightly different focus settings.

7) Snap off a shot and look at the result (the great thing about digital cameras), if it's too dark then change the shutter speed 2 setting slower, say from 1 second to 3 seconds. Adjust the shutter speed the other way if the moon is too bright. Experiment until the image looks good. I also like to bracket shots around the initial setting doing one at 1 stop lower and 1 stop higher. For example 1/2 second - 1 second - 2 seconds, just to be sure. You will need to keep adjusting as the moon gets dimmer the brighter as the eclipse progresses.

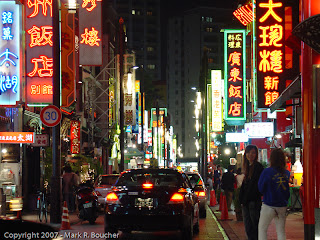
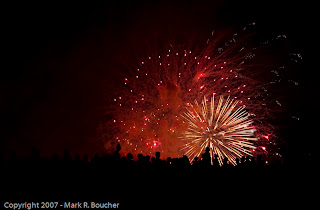
With some practice you will master your camera settings and be able to use these tips in all sorts of low light settings. City lights, Christmas lights and Fireworks all use these basic principals so experiment and have fun! I would love to see your work as well so go ahead and put some images in your comments.


In future posts I'll go into more detail about ISO, Shutter Speed and f/stop. So come on back now y'hear!

Wednesday, February 20, 2008

Lunar Eclipse!

We lucked out tonight. Cloudy skies were forecast this morning but it was clear up until about 11:15 pm. Here are a few of the images I got. I'll go into detail tomorrow on how I caught these. For now I'll let the images speak for themselves.


Take better photos!

Do you want to get the most out of your digital camera? Anyone can point-and-shoot. But to attain those dazzling professional looking shots, you'll need to avoid common mistakes and understand some basic photographic techniques.


Here are a few tips to help get you started.


1. Avoiding common mistakes –

One of the biggest advantages of digital photography is being able to fix problems in your photos after the shooting is done. However, you can save yourself a lot of time simply by taking better photos in the first place. Here are a few suggestions to help you get better results:

Pay attention to what’s in your frame: Carefully look over the image on your digicam’s LCD for anything in the frame that you don't want in the photo. If you see a telephone pole sticking out of Uncle Harry’s head then it might be a good idea to move yourself or your subject to avoid it. Always look at your background before pressing that shutter button. Besides, if you watch the background you won’t miss that shot of a UFO doing a flyby behind the wedding cake.

Use the flash: It's always better to turn off the flash on a small digital camera and use the available light, but for dimly lit, indoor snapshots, the flash can make the difference between an out of focus splash of colors or getting a sharp shot of your brother splashing backwards into the pool still wearing that rented Tux.

Avoid red-eye by changing your angle: You all have seen those photos where the people have those glowing red eyes. No, it’s not time to call the Exorcist, it’s because when using flash you shot the photo with the subject’s face dead on. Move to a slight angle to decrease the intensity of the red-eye.

Get closer to your subjects: If you intend to include a large amount of background, then by all means stand back. Otherwise, get close to your subject! Some photographers tend to stand too far away, especially when shooting portraits. Or they could just have a sensitive nose!

2. Get better prints from your digital camera

Most of the time the images on your camera's LCD screen look great but are disappointing when you print them. No it’s not time to play Office Space and take the printer out to the sandpit and clobber it into little chunks. The problem is that flaws can be difficult to see on your digital camera's small screen.

Sometimes your image simply needs a little work. If you have a photo that prints poorly, try modifying the image in Adobe Photoshop or Photoshop Elements before printing.
Lightening or darkening an image can make a dramatic difference. And sometimes it helps to boost the contrast or to use the sharpening filter (but I recommend that you do so sparingly).

3. Put your photos online for friends and family to enjoy

Because there are no film or processing costs involved when using a digital camera it’s easy to snap a humongous number of photos. Finding a practical way to share your pictures with friends and family can be a hassle. Fortunately, there are many Web sites that allow you to upload your photos to online albums, as well as order prints of them to be mailed to your home.

Photo-sharing Web sites, such as Webshots, Flickr, or Shutterfly let you arrange your photos into albums and display them for visitors. Many of these sites also offer online image-editing tools that will help you erase that Frisbee logo from your UFO photos.

Tuesday, February 19, 2008

New Painting

This cute little girl was a pleasure to photograph. She has an adorable personality and was very photogenic. I created a watercolor painting of her over the weekend. Please click on the image to see the painting detail. There are many different painting possibilities to choose from; watercolor, acrilyc, oils, chalks along with different papers or canvas. Choosing what to go with is a matter of studying the image for a while and waiting for that lightbulb to appear over my head! To me a watercolor goes really well with small children along with pastel colors. Gives it a bit of an old-fashioned feel....


Tuesday, January 15, 2008


Hands that Touch, Hearts that Feel,
Images that Speak......
Who do you trust to tell your special story?

Is your story about your joyful wedding or the birth of your wonderful new baby? Or are you a senior getting ready to graduate and need dazzling and creative portraits created? No matter the story it is important that the photographer you choose has the vision and the heart to properly record your story with images that speak to your heart. Images that create lasting memories that can be passed down to your children and grandchildren…..

When you choose Mystical Light Photography you will have a photographer who truly cares about you and will listen to your story. After all its your memories that you are trusting me to record, so if you have any special requests just let me know. Any creative ideas you have will be most welcome. Whatever you needs I will go above and beyond to accommodate you.

I specialize in Charleston and Columbia area weddings, family, child & baby portraits as well as events and commercial food and catalog photography in the Charleston/Columbia area. I also offer gorgeous digitally hand-painted Fine Art portraits on your choice of art paper or canvas. A family heirloom that will be handed down and enjoyed for generations.

Check out my website at:

http://www.mysticallightphoto.com